Git用法的简明介绍,以及在用Git过程遇到的问题和解决方法。
官方资料
官方的用户手册Pro Git book 中文版
Git基础
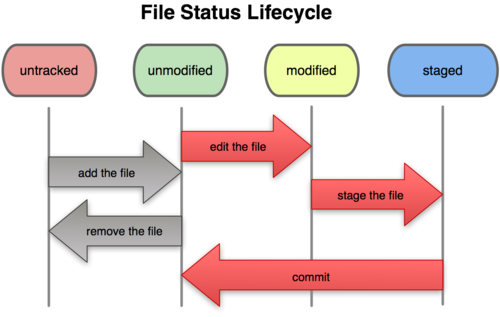
工作目录下面的所有文件都不外乎这两种状态:已跟踪或未跟踪。跟踪的文件处于unmodified、modified、staged三种状态周期循环。在编辑过某些文件之后,Git 将这些文件标为已修改。我们逐步把这些修改过的文件放到暂存区域,直到最后一次性提交所有这些暂存起来的文件,如此重复。所以使用 Git 时的文件状态变化周期如下图所示。
local本地仓库
初始化 [config/init]
全局变量
1 | |
新版本库
1 | |
设置忽略文件
这一步骤应该紧跟git init
- 设置每个人都要忽略的文件,则添加
.gitignore文件,在建版本库的目录(根目录)下创建文件.gitignore; - 设置只有自己要忽略的文件,则修改
.git/info/exclude文件,可以用正则表达式。
.gitignore .git/info/exclude文件内容类似,例如:
1 | |
基本操作
提交 [commit]
- 提交所有文件
git commit -a -m "comment" - 提交单个文件
git commit -m "add readme" readme.txt - 增加修改提交
git commit -C HEAD -a --amend
撤销修改 [checkout/revert]
撤销未提交的修改
git checkout HEAD readme.txt 从HEAD版本检出
git checkout HEAD *.txt
git checkout HEAD .
撤销已提交的修改
- 反转最近一次提交
git revert --no-commit HEAD相当于最近一次提交的反操作,恢复到HEAD版本,并且不添加log记录 - 复位到之前的版本
git reset HEADgit reset HEAD [filename]相当与返回到之前的
例:撤销readme.txt到之前某个版本:
git log readme.txt列出与readme.txt相关的log
1 | |
git reset 87eac03c968ba2b9abaac3e08969eb47bb0e8c19 readme.txt 撤销到之前的版本,不会删除撤销前的版本
git checkout readme.txt 检出到本地
分支操作
分支基本操作 [branch]
- 列出本地所有分支
git branchgit branch -a - 创建分支
git branch <branchname> <commitno>
git branch <branchname> [HEAD] - 检出分支
git checkout <branchname> - 基于当前分支末梢创建分支并检出
git checkout -b <branchname> -
基于某次提交、分支或标签创建分支
git branch <branchname> <commitno>
git branch <branchname2> <branchname>
git branch <branchname> <tagname> -
删除分支
git branch -d <branchname>没合并的分支会删除失败
git branch -D <branchname>没合并的分支也会被删除,强行删除 - 重命名分支
git branch -m <branchname> <newname>不会覆盖已存在的同名分支
git branch -M <branchname> <newname>会覆盖已存在的同名分支
分支合并 [merge]
- 普通合并
合并并提交git merge <branchname>如果发生冲突则不自动提交;如果冲突很多,可以git checkout HEAD .撤销
合并不提交git merge --no-commit <branchname> - 压合合并
压合并提交git merge --squash <branchname>
压合不提交git merge --squash --no-commit <branchname> - 挑选合并 推荐使用
挑选某次提交合并但不提交git cherry-pick --no-commit <commitno>
解决分支合并的冲突 [mergetool]
- 冲突少时,直接编辑冲突文件再提交
- 冲突多复杂时,使用
mergetool
使用mergetool依次完成:mergetool自动生成.BACKUP.BASE.LOCAL.REMOTE四个文件- 指定调用冲突解决工具,如
meldkdiff3等 - 解决后删除
.orig文件 - 提交
用
meldkdiff3编辑冲突git mergetool -t meld
git mergetool -t kdiff3
具体可以见 这里
储藏 [stash]
暂存不提交的功能,不适合多用
储藏当你做了修改想暂时储藏,但有不想commit时,可以用git stash [save]。
不提倡使用git stash,因为没有commit很容易忘记。git stash以后要及时挑选合并(cherry-pick)。
git stash [save]将当前的工作区内容暂时储藏到Git栈中。从最近的一次提交HEAD中读取相关内容,让工作区保证和上次提交的内容一致。git stash list显示Git栈内的所有备份,可以利用这个列表来决定从那个地方恢复。
stash@{0}: WIP on master: 95c87fd after mergestash@{1}stash@{2}等。git stash pop从Git栈中读取最近一次储藏的内容,恢复工作区。栈中可能存在多个stash的内容,pop会从最近的一个stash恢复。git stash apply stash@{n}从Git栈中读取stash@{n},例如:stash@{0}stash@{1}stash@{2}等。git stash clear清空Git栈。此时使用gitk等图形化工具会发现,原来stash的哪些节点都消失了。
标签 [tag]
- 创建标签
git tag 1.0为当前分支最近一次提交创建标签 标签无法重命名
git tag <tagname> <branchname>为某分支创建标签
git tag 1.1 <commitno>为某次提交创建标签 - 显示标签
git tag - 检出标签
git checkout 1.0查看标签断面很方便,但不能提交 - 由标签创建分支
git branch <branchname> <tagname>
git checkout -b <branchname> <tagname> - 删除标签
git tag -d 1.0
查看状态 [log/gitk]
- 当前状态
git status - 历史状态
git log查看分支历史记录
gitk [<branchname>]
gitk --all查看所有分支 - 每个分支最后的提交
git branch -v
导出版本库 [archive]
git archive --format=zip HEAD>projectname.zip
git archive --format=zip --prefix=tag1.0/ HEAD>projectname.zip
remote远程仓库
初始化
创建本地库
可以在移动存储设备上创建仓库,从而实现不同主机代码同步
git init --bare --share 创建了一个公共的仓库,bare库
克隆版本库 [clone]
git clone <url>
git clone h:\gitrep\projectname- 克隆后自动添加一些config
remote.origin.fetch=+refs/heads/*:refs/remotes/origin/*
remote.origin.url=...
branch.master.remote=origin
branch.master.merge=refs/heads/master
别名
- 添加别名
git remote add <alias> <remote url> - 添加后自动添加一些config
remote.origin.url=...
remote.origin.fetch=+refs/heads/*:refs/remotes/origin/* - 删除别名
git remote rm <alias>
基本操作
分支 [branch]
- 列出远程仓库分支
git branch -r - 创建远程仓库分支,并将当前分支推入该远程分支
git push origin <remote_branchname> - 删除远程分支
git push origin :<remote_branchname> - 删除远程库中不存在的分支
git remote prune origin
标签 [tag]
- 查看远程仓库标签
git tag -r - 创建远程标签,推入到远程相应分支即可
git push origin <remote_branchname> - 删除远程标签
git push origin :refs/tags/<tagname>
远程库中获取 [fetch/pull]
- 获取但不合并
git fetch <remote repo>
git fetch origin
git fetch <url> - 获取且合并到当前本地分支,
git pull相当于git fetch origin master;git merge origin/mastergit pull
从默认远程仓库获取,相当于git pull origin
需配置branch.master.remote=originbranch.master.merge=refs/heads/master,如果使用git clone远程库会自动添加以上配置git pull h:\gitrep\projectname master
不是从默认远程仓库获取,所以要指定获取哪个分支
推入远程库 [push]
git push origin master将本地master分支推入到远程库的master分支- 查看远程仓库分支
git remote -v git push origin <local_branchname>:<remote_branchname>将分支<local_branchname>推入远程库分支<remote_branchname>
例如:git push origin test:master将本地test分支推入到远程master分支
git push origin test:test将本地test分支推入到远程test分支
git push origin :test删除远程分支test